How to initialize a new Catalyst project
Inside the Cookbook
- Prerequisites: Preparing your development environment
- Step 1: Create a new project folder
- Step 2: Initialize the project
- Step 3: Project initialization and files created
- Step 4: Using the Catalyst CLI for local development
- Step 5: Optional - Using Visual Studio Code with Catalyst tools
- Wrapping up
Catalyst is a powerful full-stack cloud platform that allows developers to build and scale modern applications with minimal overhead.Whether you're creating a simple API or a full-scale web application, Catalyst provides all the tools you need to streamline development and deployment.
In this guide, we’ll walk you through the process of initializing a new project in Catalyst, using its Catalyst CLI.
This process will get your project up and running quickly, ensuring you're ready to develop cloud-native applications without worrying about infrastructure management.
Prerequisites: Preparing your development environment
Before you begin, ensure the following components are set up:
Catalyst account - If you don’t already have one, sign up here.
Node.js - The recommended version for Catalyst is Node.js v12+. You can download it here.
Catalyst CLI - To interact with Catalyst directly from your terminal, you need to install the Catalyst CLI.
Use the following command to install it globally:
Once you have these prerequisites set up, you're ready to start the process of initializing your Catalyst project.
Step 1: Create a new project folder
Start by creating a new directory where your Catalyst project will reside. This is where your project files will live and be organized
This will create a new folder named my-catalyst-app; navigate into it.
Step 2: Initialize the project
Now that you have your project directory, it’s time to initialize your Catalyst project. The Catalyst CLI will walk you through an interactive setup process to create your project and configure it to use various features.
Run the following command:
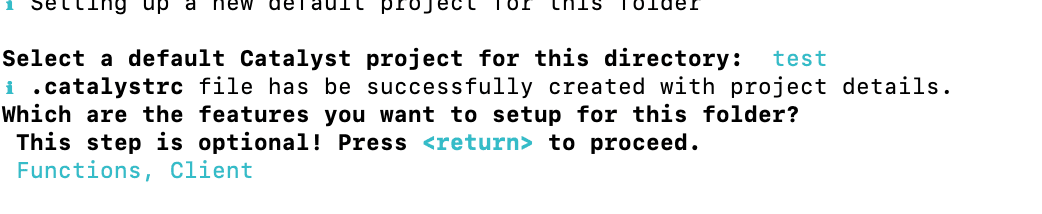
Select Components to Initialize: Here, you can choose to initialize specific components of your app. This is where you decide what parts of the stack you want to work with.
Functions: This is for adding backend logic to your app (for example, APIs, microservices).

Client: If you’re serving static frontend assets, like HTML, CSS, and JavaScript, select this option.

AppSail: For deploying full-stack apps (for example, Node.js, Python, or Go).
Use the space bar to select or deselect components. Press Enter to continue.


Step 3: Project initialization and files created
Once you’ve completed the prompts, the Catalyst CLI will initialize your project, creating the necessary files and directories.
Here are the files and directories you’ll find in your project folder:
catalyst.json: Contains metadata about your project (like project name, organization).
.catalystrc: Stores local configuration settings specific to your development environment.
functions/: Contains backend logic if you selected the “Functions” component.
client/: Stores frontend assets if you selected the “Client” component.
appsail/: For full-stack apps like Node.js, Python, or Go.
Step 4: Using the Catalyst CLI for local development
Now that your project is initialized, you can begin developing locally. The Catalyst CLI offers several commands to help you manage your app during development:
Add a function: If you want to create a backend function (like an API or service), use the following command:


Step 5: Optional - Using Visual Studio Code with Catalyst tools
If you prefer using an IDE for development, Catalyst offers a VS Code extension called Catalyst Tools. With this extension, you can:
Initialize and manage your projects directly from VS Code.
Deploy and test functions locally.
View logs and monitor app activity without leaving your development environment.
You can install this extension directly from the VS Code marketplace.
Wrapping up
Initializing a new project in Catalyst is quick and straightforward, enabling you to get your app off the ground with minimal setup. Whether you're building a full-stack web application, microservices, or serverless functions, Catalyst simplifies development by handling all the backend infrastructure for you.
With the flexibility to choose the components you need, easy local development, and seamless cloud deployment, Catalyst empowers you to focus on what matters most writing great code and building innovative applications.