Home>Developer Toolkit>Deploying your Node.js application to the cloud

Deploying your Node.js application to the cloud

catalyst usecase author
Srilakshmi | Technical writer

Inside the Cookbook

    • Why choose Catalyst for your Node.js application?
      • Step-by-Step Guide:
        • Sign Up for Catalyst by Zoho
        • Create a New Node.js Project
        • Set Up Your Local Project Folder
        • Initialize Your Catalyst Project
        • Add Your Code
        • Test Locally
        • Deploy Your App
      • Managing your application post-deployment
        • Extending functionality with Catalyst
          • Wrapping up

            • Deploying applications to the cloud should be easy and efficient, especially when your focus is on development rather than infrastructure management.

            •  Catalyst is a powerful full stack cloud platform that simplifies cloud deployment by handling scalability, infrastructure, and operations for you. 

            • In this guide, we’ll walk you through the process of deploying a Node.js application to Catalyst, ensuring a smooth transition from local development to cloud production.

            • Want to see it in action first? Check out the deployed Node.js mock email validator app here!

            Why choose Catalyst for your Node.js application?

            Catalyst offers several key benefits for developers.

            • Serverless architecture: Catalyst abstracts infrastructure management, freeing you to focus on your app’s functionality.

            • Automatic scaling: Your app scales effortlessly based on demand, handling increased traffic without manual intervention.

            • Integrated ecosystem: Catalyst integrates seamlessly with databases, APIs, and workflows, enabling you to build complex applications easily.

            • Simplified deployment: With a minimal setup process, Catalyst reduces deployment time, enabling faster delivery of applications.

            Step-by-Step Guide:

            Sign Up for Catalyst by Zoho


            Head over to catalyst.zoho.com and sign up for a free account. Once signed in, you’ll land on your dashboard this is your control center for all projects and apps.

            Create a New Node.js Project

            Click Create New Project on the dashboard.

            Set Up Your Local Project Folder

            Open your terminal and run

            
            mkdir nodejsapp
            cd nodejsapp


            This creates a clean folder where your app code and Catalyst configs will live.

            Initialize Your Catalyst Project

            catalyst init 


            You’ll be guided through several setup prompts.

            • Select your Catalyst project: Choose the project you just created on the dashboard.

            • Select language runtime: Pick Node.js for this tutorial.

            • Choose features: Select Functions and Client (this means you’ll deploy backend logic and a simple frontend).

            • Select the function type: Choose BasicIO (the simplest function type for reading input and writing output).

            • Select the client type: Choose Basic Web App (for HTML, CSS, and JavaScript frontend).

            • Once these are selected, Catalyst finishes setting up your local environment with the necessary configs.
            • Check out - Create your first Catalyst project
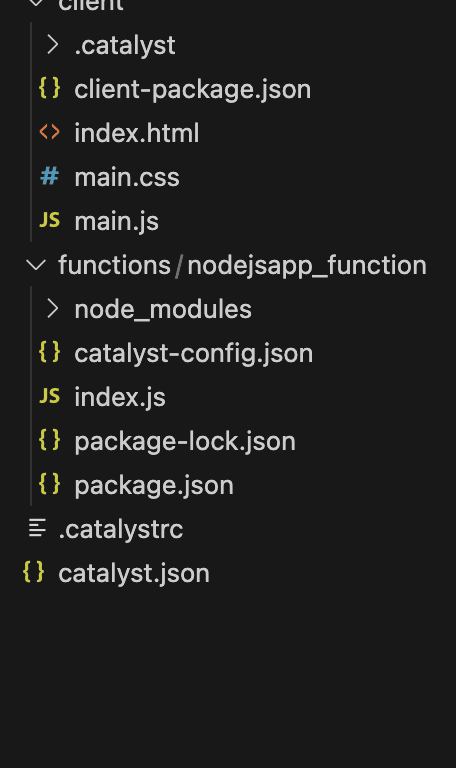
            Add Your Code

            Copy and paste your backend logic in the nodejsapp_funtion under function folder

            
            module.exports = (context, basicIO) => {
                try {
                    const email = basicIO.getArgument('email');
                    const isValid = /^[^\s@]+@[^\s@]+\.[^\s@]+$/.test(email);
                    const isCorporate = isValid && !email.endsWith('@gmail.com') && !email.endsWith('@yahoo.com');
                    const message = isValid
                        ? isCorporate
                            ? "Valid corporate email."
                            : "Valid personal email, not corporate."
                        : " Invalid email format.";
                    basicIO.write(message);
                    console.log(`Input email: ${email}, Result: ${message}`);
                } catch (err) {
                    basicIO.write(' An error occurred while processing your input.');
                    console.error('Validation error:', err);
                } finally {
                    context.close();
                }
            };


            Then, Replace your html, CSS, and JavaScript files with the frontend code given as example, or customize your own.

            - Add the below code in your index.html file located inside Client folder:

            
            <!DOCTYPE html>
            <html lang="en">
            <head>
                <meta charset="UTF-8" />
                <title>Email Validator</title>
                <link rel="stylesheet" href="main.css" />
            </head>
            <body>
                <div class="container">
                    <h1>📧 Email Validator</h1>
                    <input type="text" id="emailInput" placeholder="Enter your email" />
                    <button onclick="validateEmail()">Check</button>
                    <p id="response"></p>
                </div>
                <script src="main.js"></script>
            </body>
            </html>


            Add this code in Main.css file located inside Client Folder.


            /* LET THE STYLING BEGIN */body {
                font-family: 'Arial', sans-serif;
                background: #f5f6fa;
                display: flex;
                justify-content: center;
                align-items: center;
                height: 100vh;
            }
            .container {
                background: #fff;
                padding: 40px;
                border-radius: 8px;
                box-shadow: 0 8px 24px rgba(0, 0, 0, 0.05);
                text-align: center;
                width: 90%;
                max-width: 400px;
            }
            input {
                padding: 10px;
                width: 80%;
                border: 1px solid #ccc;
                border-radius: 4px;
                margin-bottom: 12px;
            }
            button {
                padding: 10px 20px;
                background: #0077cc;
                color: white;
                border: none;
                border-radius: 4px;
                cursor: pointer;
            }
            button:hover {
                background: #005fa3;
            }
            #response {
                margin-top: 20px;
                font-weight: bold;
                color: #333;
            }
            //css file


             Add this code in your Main.js file located inside Client Folder.

            
            function validateEmail() {
                const email = document.getElementById('emailInput').value;
                const responseEl = document.getElementById('response');
            //Replace yout actual endpoint here
                fetch(`https://nodejsapp-sample-endpoint?email=${encodeURIComponent(email)}`)
                    .then(res => res.text())
                    .then(data => {
                        responseEl.textContent = data;
                    })
                    .catch(err => {
                        console.error('Error:', err);
                        responseEl.textContent = 'Failed to validate email.';
                    });
            }


            Test Locally

            Test Locally with Catalyst Serve 

            Before deploying, test your app locally to catch any issues: 

            catalyst serve


            This runs your function and frontend on a local server. Open the provided URL (usually http://localhost:3000) in your browser and try validating emails. Make sure everything works perfectly.

            Deploy Your App

            Once you’re happy with local testing, deploy your app to the cloud with:

            catalyst deploy


            Catalyst uploads your code and configuration, then provides a public URL where your app is live and accessible from anywhere.

            Managing your application post-deployment

            Once deployed, you’ll want to monitor and manage your Node.js application. Catalyst offers built-in tools for viewing logs, scaling resources, and ensuring the application runs smoothly.

            • View logs: Access logs either through the Catalyst dashboard or by using the CLI: catalyst logs --app <your-app-name>

            • Scaling: Catalyst handles scaling automatically, but you can also adjust resources manually based on your needs. This ensures your app can efficiently handle both small and large traffic spikes.

            Extending functionality with Catalyst

            Catalyst isn’t just for deploying Node.js apps; it’s a comprehensive platform offering  more features such as the following:

            • Database integration - Integrate Catalyst’s Data Store to manage user data, application states, and other persistent information.

            • Workflows & automation: Use Catalyst workflows to automate tasks such as sending emails, triggering notifications, or running scheduled jobs.

            These advanced capabilities allow you to build dynamic and feature-rich applications that can grow alongside your needs.

            Wrapping up

            • Catalyst is a full-stack cloud platform that streamlines application development, offering features like automatic scaling, database and API integration. More so, you can focus on building rather than managing infrastructure.

            • Whether you’re deploying a simple web service or a complex, data-driven app, Catalyst simplifies cloud deployment, offering a scalable, secure, and efficient platform for developers.

            • By following this guide, you can deploy your Node.js app to Catalyst in just a few steps, ensuring your application is live and scalable with minimal effort.